Notebooks are the primary runtime on Databricks from data science exploration to ETL and ML in production. This emphasis on notebooks calls for a change in our understanding of production quality code. We have to do away with our hesitancy about messy notebooks ask ourselves: How do we move notebooks into our production pipelines? How do we perform unit and integration tests on notebooks? Can we treat notebooks as artifacts of a DevOps pipeline?
Databricks Notebooks as first class citizens
When choosing Databricks as the compute platform your best option is to also run notebooks in your production environment. This decision is dictated by the overwhelming support for the notebooks runtime versus classic python scripting. We argue that, one should fully embrace the notebooks approach and choose the best methods to test and deploy notebooks in a production environment. In this blog, we use Azure DevOps pipelines for notebook (unit, integration) testing using transient Databricks clusters and notebook artifact registration.
Notebooks: entry point of a python package
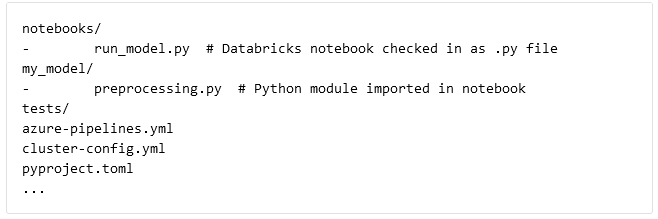
Notebooks can live in isolation, but we prefer them as part of a Git repository, which has the following structure. It contains a notebooks directory to check in Databricks notebooks as Source files, a Python package ('my_model') containing functionality to be imported in a notebook, a tests directory with unit tests for the Python package, an Azure DevOps pipeline and a cluster-config.json to configure our transient Databricks clusters. Additionally we use Poetry for Python dependency management and packaging based on the pyproject.toml specification.
Notebook pull request pipeline
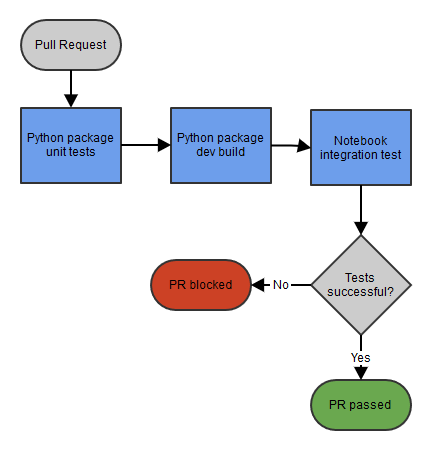
When developing notebooks and their supporting Python package, a developer commits on a development branch and creates a Pull Request for colleagues to review. The Pull Request automatically triggers an Azure DevOps Pipeline that has to succeed on the most recent commit. First we run the unit tests of the Python package and on success build it and publish the dev build to Azure Artifacts. The version string of this dev build package is passed to the notebook input widget "package_version" for notebook integration testing on our staging environment. The pipeline validates whether the notebook runs successfully (whether dbutils.notebook.exit is called) and provides feedback on the Pull Request.
Integration test on a transient cluster
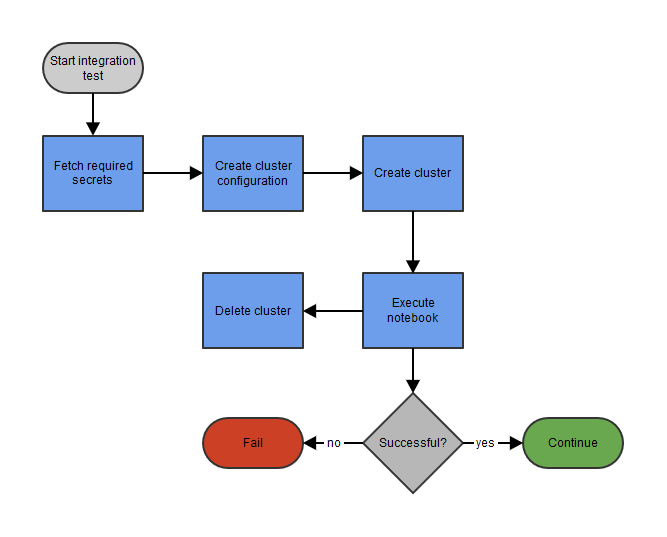
The goal is to execute this notebook on Databricks from an Azure DevOps pipeline. For flexibility, we choose Databricks Pools. The advantage of these pools is that they can reduce the startup and auto-scale times of clusters when many different jobs need to run on just-in-time clusters. For the execution of the notebook (and access to optional data sources) we use an Azure App Registration. This Azure App Registration will have permissions to manage Databricks clusters and execute notebooks. The basic steps of the pipeline include Databricks cluster configuration and creation, execution of the notebook and finally deletion of the cluster. We will discuss each step in detail.
In order to use Azure DevOps Pipelines to test and deploy Databricks notebooks, we use the Azure DevOps tasks developed by Data Thirst Ltd. As their set of tasks does not yet support all needed operations, we also use their PowerShell tools they developed for Databricks. Both the tasks and PowerShell tools are wrappers around the Databricks API.
Databricks permissions for App Registration
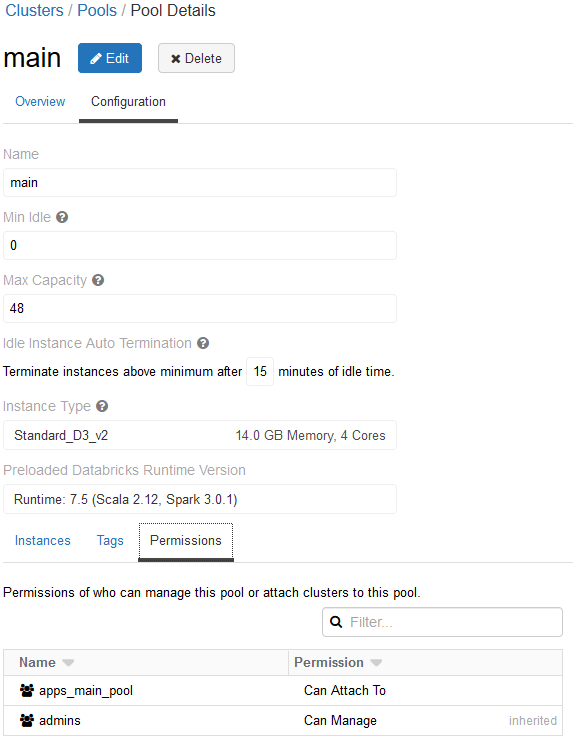
As preparation we create a Databricks pool that is available for integration tests. We use an Azure App Registration that acts as a principal to execute notebooks on the instance pool. The App Registration is registered as a Databricks Service Principal with the "Can Attach To" permission on the Databricks pool to create cluster.
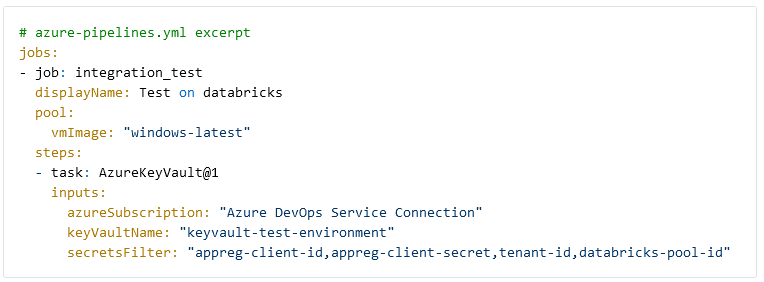
Preparing pipeline secrets
The first step of the CI/CD pipeline is to fetch all required secrets. For simplicity, we store the app registration client id, secret, tenant-id and the Databricks pool ID in a Key Vault. The secrets are collected using the AzureKeyVault task.
Databricks workspace connection
To interact with Databricks we need to connect to the workspace from Azure DevOps. We use two Azure Devops Tasks from Data Thirst to generate an access token for Databricks and to connect to the workspace. The token is stored in the BearerToken variable and generated for the app registration we have granted permissions in Databricks. The workspace URL can be found in the Azure Portal on the Databricks resource.
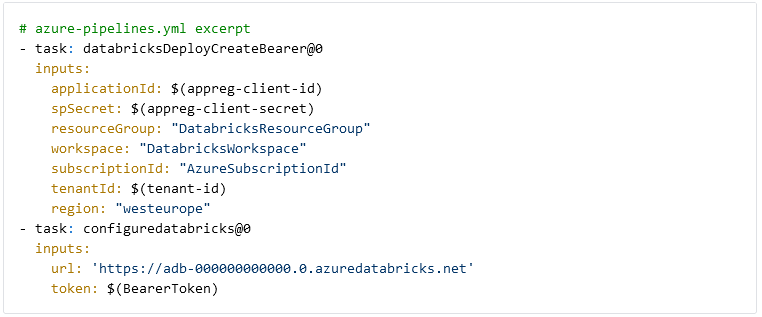
Please note, there is a potential security issue by using the databricksDeployCreateBearer task, which we have resolved in our live pipelines. The current version of the task creates bearer tokens without an expiration date, and, unfortunately, there is no way to set an expiration date using the task. As an alternative, it is possible to use the Powershell Databricks tools from Data Thirst as well. By consecutively calling Connect-Databricks and New-DatabricksBearerToken it is possible to create a token with a limited lifetime.
Creating a transient test cluster
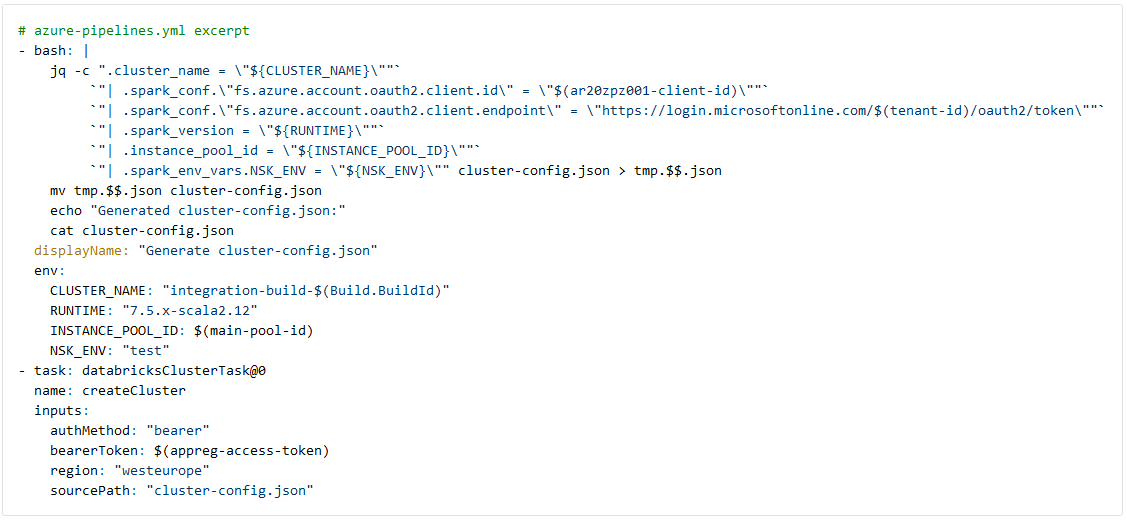
After setting up the connection to Databricks, we create a dedicated cluster in the Databricks for the purpose of the integration tests executed by this pipeline. The cluster configuration consists of just 1 worker, which is sufficient for the integration test. As we store test data needed for the notebooks on an ADLS gen2 storage account, we setup ADLS pass-through to allow the app registration to authenticate with the storage account. For best practices we do not insert the app registration client secret directly in the cluster config, as this will be visible in Databricks. Instead, we use a Databricks Secret Scope and its template markup in the cluster config, which is filled at runtime.

We commit the above template of the cluster configuration file and use the linux `jq` command to fill out details such as the pool id and app registration client id from the Azure Key Vault at runtime. The cluster name is based on the current devops Build ID and together with other parameters the cluster-config.json is rendered and written to disk.
The databricksClusterTask from Data Thirst uses the rendered cluster-config.json to create and deploy a cluster on our staging environment with resources taken from the Databricks pool.
Execute notebook
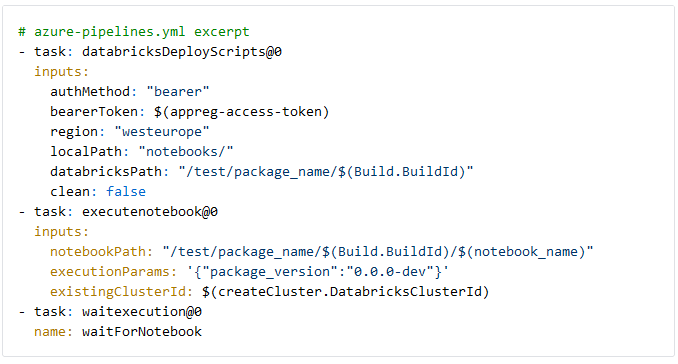
Finally, we can upload the notebook to test and execute it. The databricksDeployScripts task uploads the notebook to Databricks, which is executed using the executenotebook task. The notebook is stored in a path containing the devops Build ID to identify (and delete) it later if needed. If the notebook uses widgets, the executionParams input is used to pass a JSON string with input parameters. In our case, the Python package dev version string is passed as "package_version" for controlled integration testing. Finally, we wait for the execution of the notebook to finish. The executenotebook task finishes successfully if the Databricks builtin `dbutils.notebook.exit("returnValue")` is called during the notebook run.
Notebook artifact release
Notebooks that have been tested successfully are ready to be stored for use in production pipelines. We use Azure devops artifacts to register the project notebook directory as a universal package in an Azure devops artifact feed. We set a hard coded default "package_version" in the notebook input widget with sed before registering the notebook artifact, see below (example release 1.0.0). The accompanying Python package is also registered as an artifact with the same name and version, but in a different artifact devops artifact feed. This ensures that by default the notebook will run with the Python package version it was tested. Our notebook artifact are thus reproducible and allow for a controlled release process. How you generate release versions is up to you. Initially you can add a git tag to the main branch to trigger a build including artifact registration. For full CICD you could do automatic versioning on pull request merge.

Conclusion
We have shown how to run notebook integration tests on transient Databricks clusters accompanied by Python package unit tests. This results in reproducible notebook artifacts allowing for a controlled release process for notebooks. Databricks notebooks are first class citizens and require engineers to emancipate notebooks into their test and release processes. We look forward to learn more about merging the realities of data scientists with those of the data engineer with the goal increase productivity, regular releases. Our goal is to ease the move from exploration, proof-of-concept to production. In our next blog we will go in depth how to use notebook artifacts in production pipelines with an emphasis on Azure DataFactory pipelines.